You can create and edit users on AKTEK iO, and perform other actions based on your permissions
⚠️ Every user must have a role assigned, otherwise, they won't be able to see and use anything on AKTEK iO.
Table of contents
Users
Go to Admin > Users
This will open up a tab containing all actions you can do related to the users.
Here you can see all users in the system, or an empty list if you don't have any users yet. To add a new user:
- Click on the + button on the top left.
- Click on Select Image to add a profile picture.
- Enter the Name and Email of the desired user. You can also add a User ID that will work as an alternative to a user’s email during login.
- Select the country code and the phone number of the user.
- Select User type, it can be a regular user or if your company is an Agency, it can be an Account Manager or Agency manager. For additional information, please refer to this section.
- Select Platform Language (e.g. English, Spanish). By default, the platform language will be English.
-
Once satisfied, click Save to register the changes.
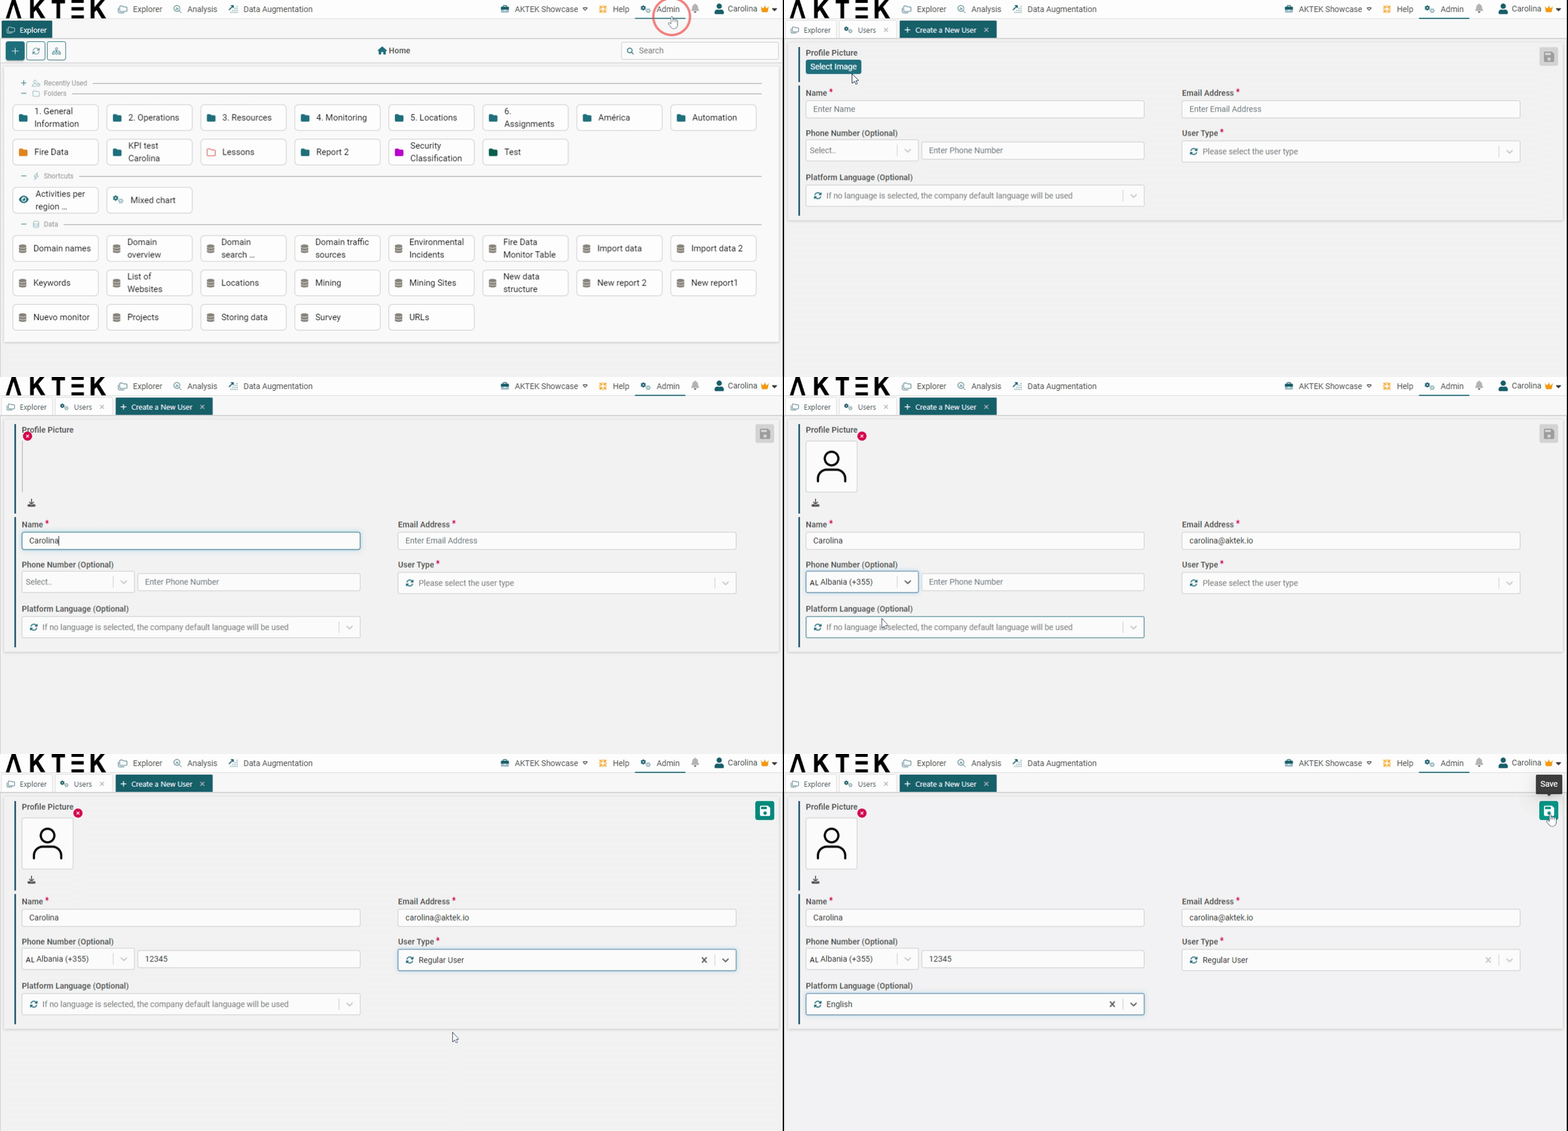
- Upon saving, an email will be sent to the new user with a special link to complete the registration by choosing a password for their AKTEK iO user.
- If your AKTEK iO instance is set up on-premise without a mail server configured, step 5 will generate a unique link for the admin to copy and share with the user to onboard via email or other means. This link will only be valid once.
✅ Types of users:
- Agency manager: users with Admin-level permissions will automatically be able to access each child company under your main account. These users are not selectable for groups, notifications or chat within child companies.
- Account managers: users that administrators from parent companies can add or delete from different child companies. These users are subject to each company’s role permissions.
- Regular users: users with access only to the parent or child company. These users can only be in one company and are subject to role permissions.
Bulk Creation of Users
- On the top left of the users' list find the Bulk Create button.
- Click on Bulk Create, then click on Download Template.
- You will get an Excel file. Fill in the users' information on this file as indicated by the columns.
-
Save the file and then click on Upload Filled Template. Users' information will be displayed in a table view.
-
Select a user or multi-select users to assign roles. Note that the roles should be defined in iO before creating users.
-
Click on Import, then Yes.
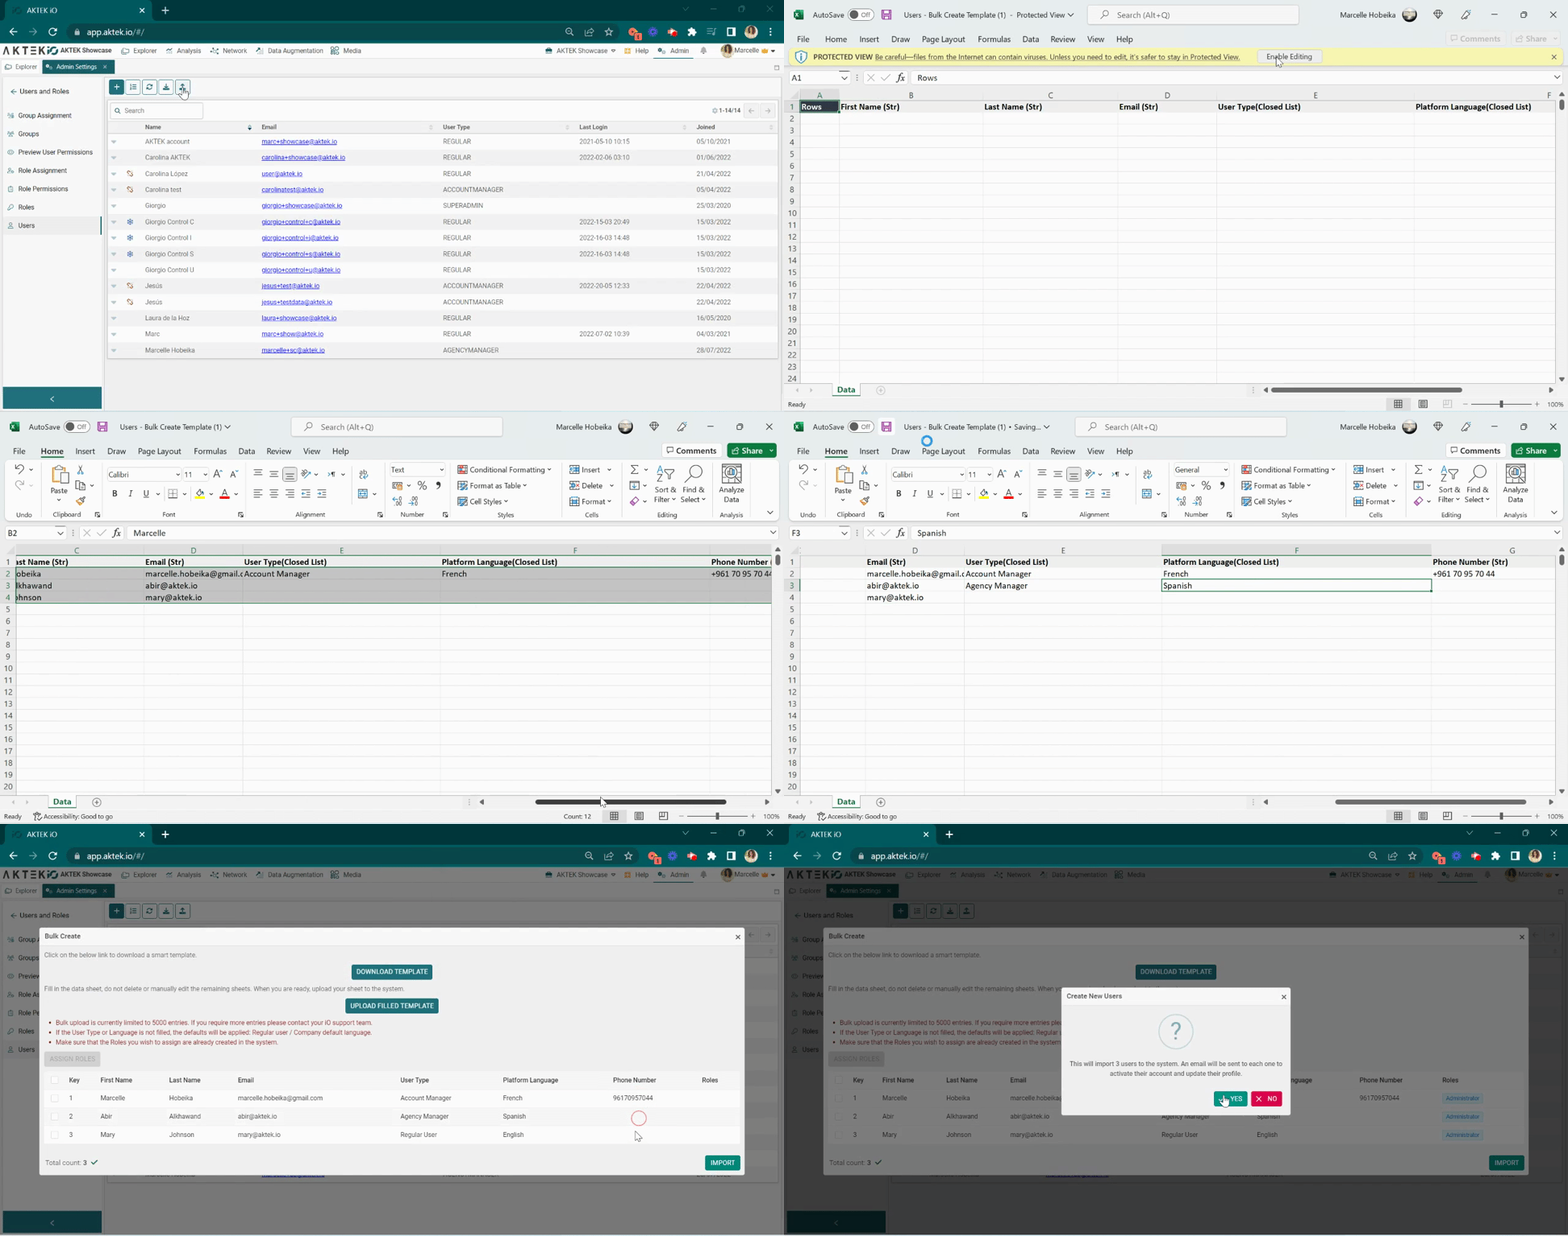
✅ Only the first name and email are mandatory. If the user type or language is not filled, the defaults will be applied: Regular user / Company default language.
✅ The first name and last name will be uploaded under the Access Control section as Name (both concatenated).
✅ Add the phone number with the international country code. Note that the phone number field is optional.
✅ You cannot add an existing email. A row with an existing email will be rejected.
✅ You can add up to 5,000 users (or up to your license's limit).
Actions on Existing Users
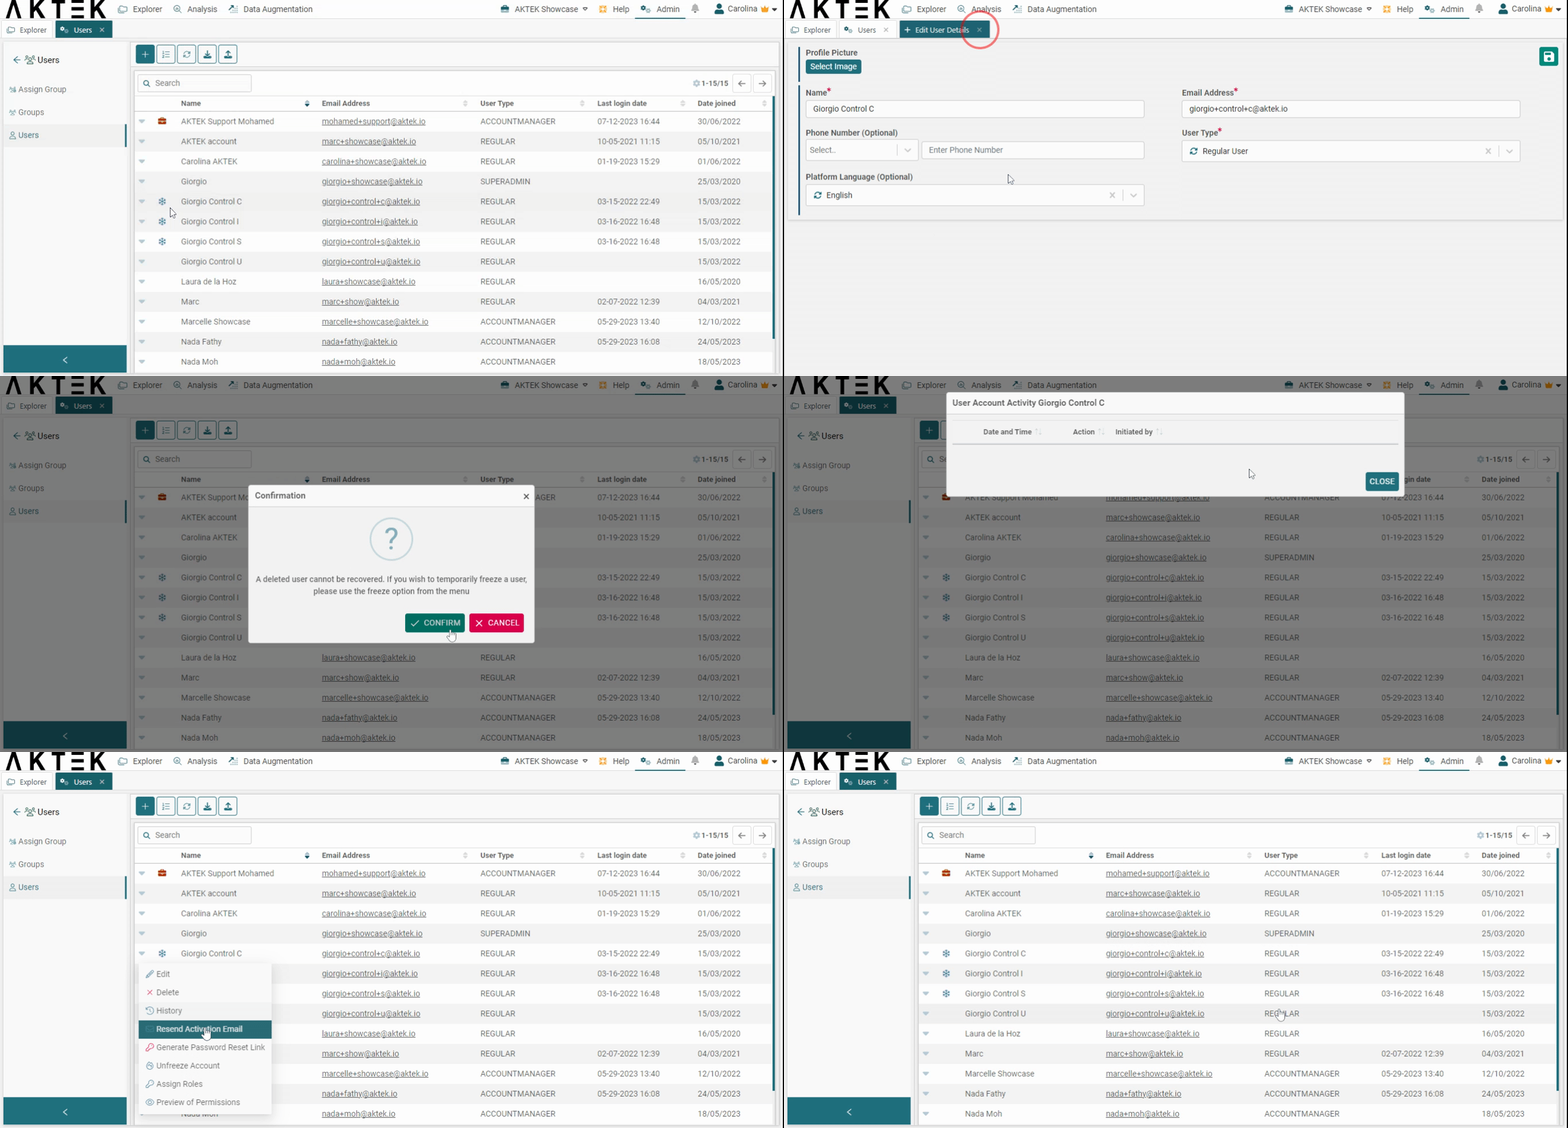
From the table of all existing users, you can use the search box to look for a specific user. Click on the menu (down arrow) on the left-hand side of the row to edit, delete, view history, resend the activation email, freeze, send a reset password link, assign roles, or preview permissions.
- Edit will allow you to change Profile Picture, Name, Platform Language, and User Type for an existing user.
- Delete a user. Please note that it's not possible to re-activate a user once it is deleted. If this user was referenced in a table, (Automatic field or Application field), the reference will remain but the word "Deleted" will show next to the name.
- View history will open a table with the user’s account activity.
-
Resend activation email will show for inactive users only.
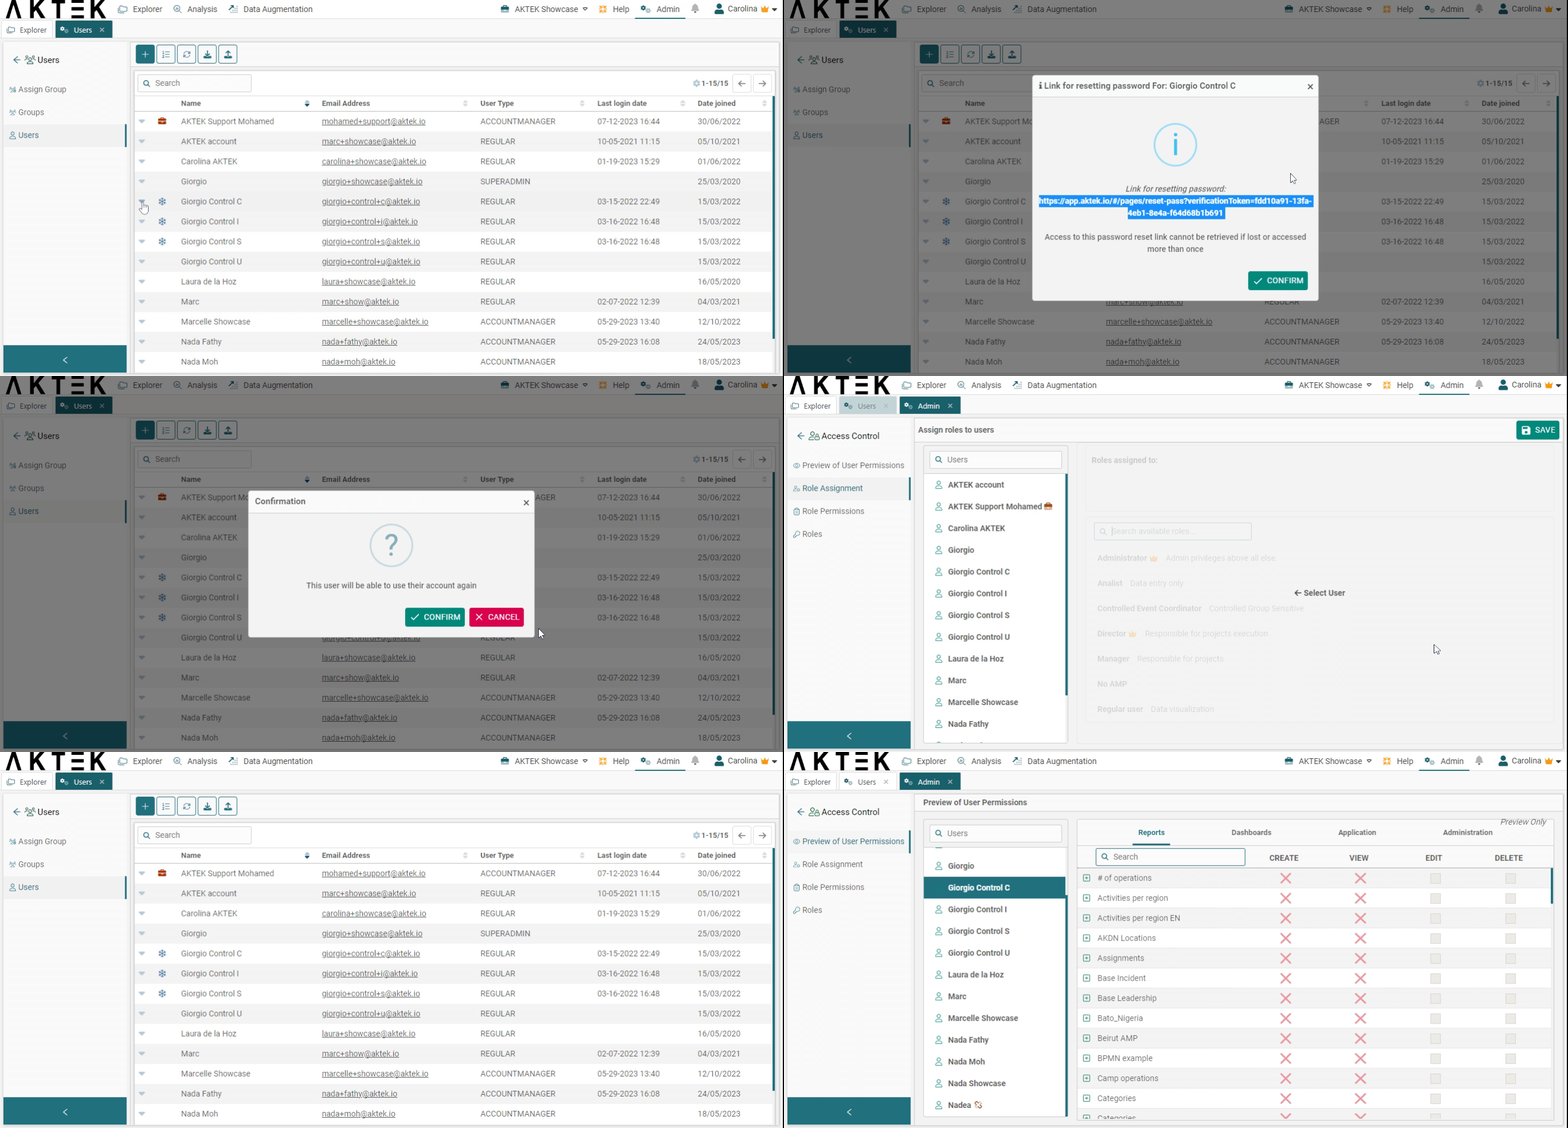
- Get Pass Reset Link will allow admin users to get a link for users to reset their own passwords. Note that links cannot be used twice or retrieved if lost.
- Freeze Account is a milder form of stopping the use of a user account. To undo, just click on the user menu again and click Unfreeze without notifying the user.
-
Assign Roles and Preview Permissions will allow you to determine what type of access a user has to view, edit or delete the data in AKTEK iO. Continue to the next sections to learn more about it.
You can also download the profiles of all existing users on an Excel sheet.
On the top of the users' list, find the Export data button. When you click on it, an Excel sheet will be downloaded with the following information:
- Joining date
- Language
- Name
- User Type
- Last Login
- Phone Number
✅ Some users cannot be frozen if Immunity against freezing is ON in their respective role.
✅ All the options above will vary depending on your user permissions level and your AKTEK iO configuration.
Roles
User roles are what determine who can do what (create, view, edit, delete) on the database. As AKTEK iO is a flexible system, it is contingent on the Admin user to set up user roles. The first step for us is therefore to create such roles.
Create roles
Go to Admin > Access control > Roles
Here you can see all roles in the system, or an empty list if you don't have any roles yet. To add a new role:
- Click on the + button on the top left.
- Add the role Name and a Description (ensure the description is clear so you can use it later as a reminder when setting the permissions).
- Lastly, you will find the Above permissions toggle. This should only be used for super admins to facilitate system maintenance and should therefore only be turned on for this specific role(s).
-
Once you are satisfied with your new role and its settings, click Save in the top right corner to save the new role.
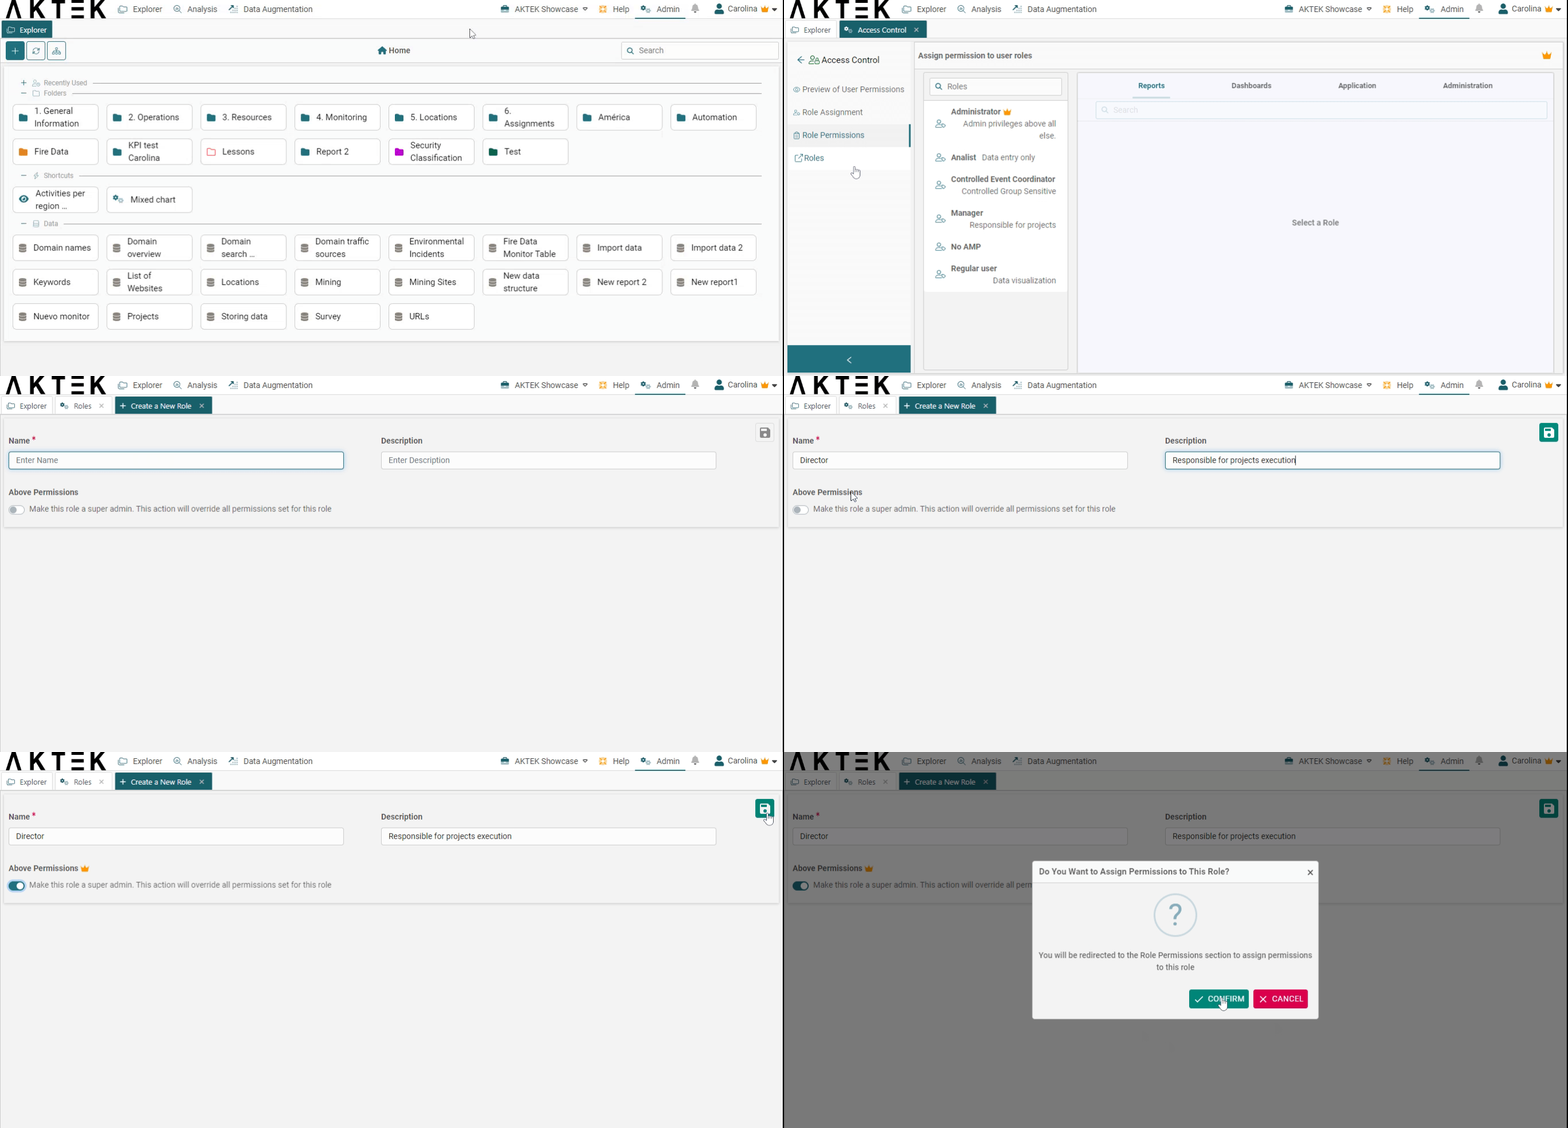
✅ When the Above permissions toggle is enabled, it will override any permission turned off, and by default, all permissions are allowed for this role.
Role Assignment
Before you do this action, make sure that you have at least one role created and permissions assigned to it.
- To assign a role, you can either:
- Accept the prompt after the creation of a new user by clicking on OK to assign a role immediately.
- Click on the left-hand menu (arrow) of the user and click on Assign roles if a role is not already assigned or if you wish to edit the role(s).
- Click on Role assignment on the Admin > Access Control section, if you wish to navigate between different users to assign/edit the role(s).
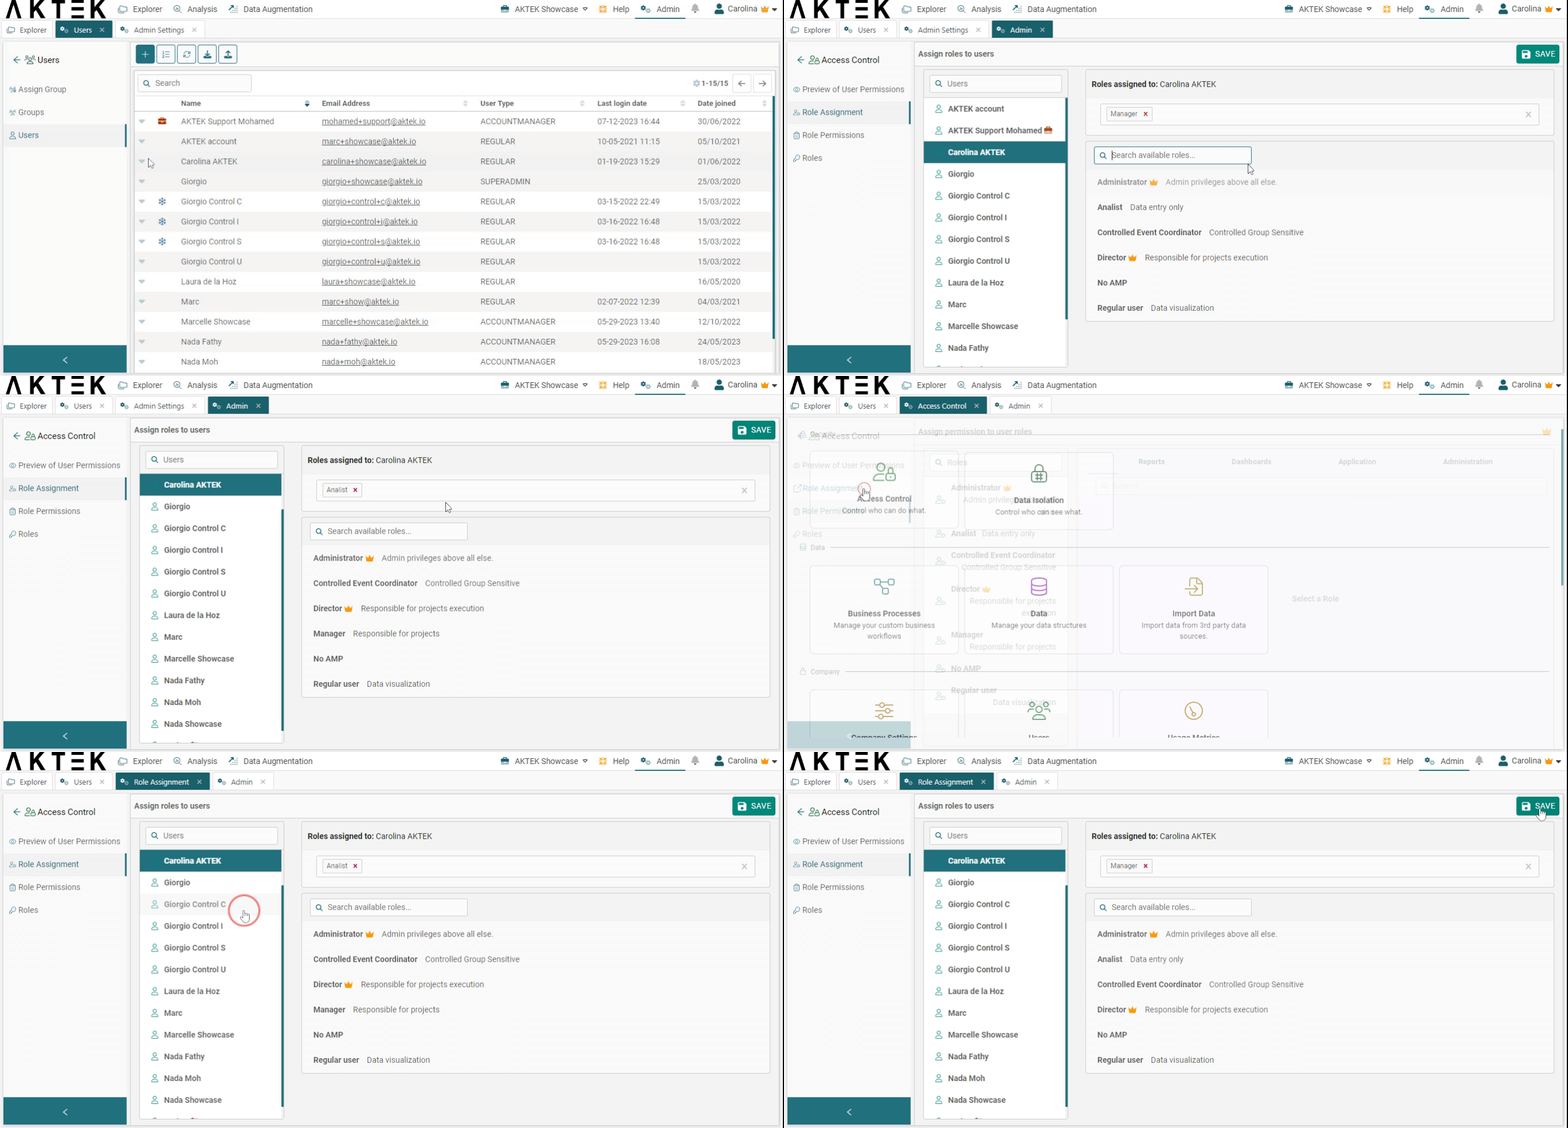
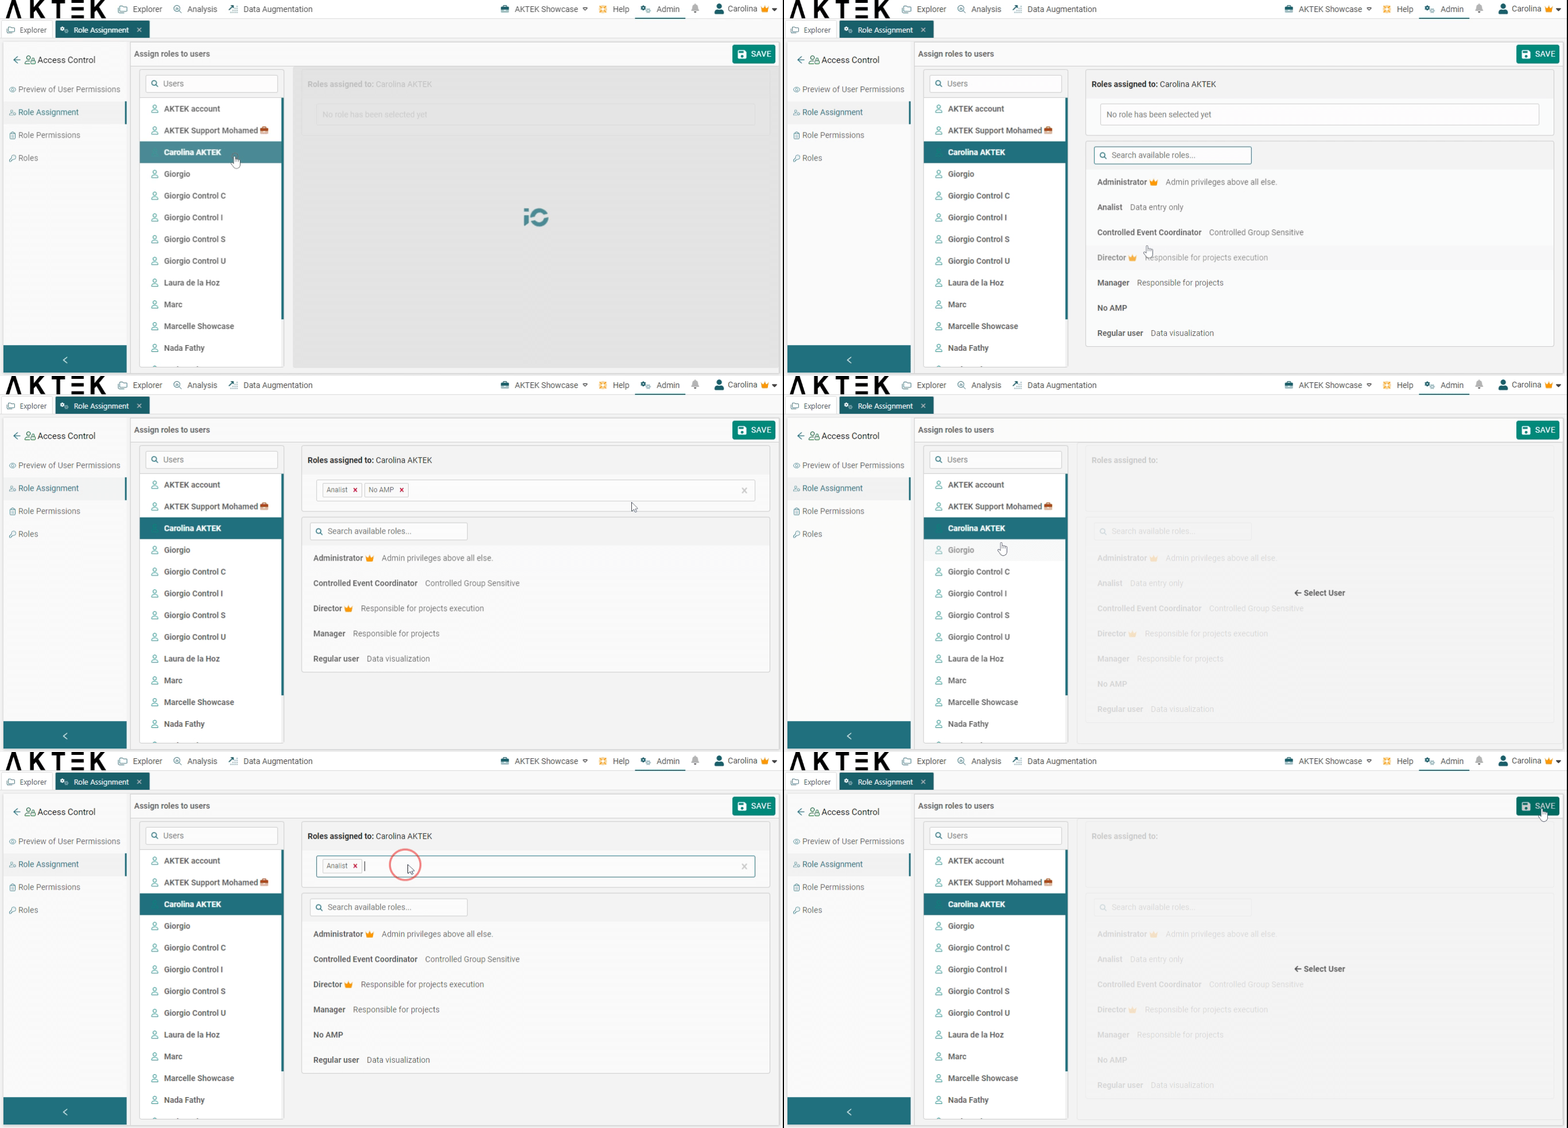
- On the left-hand side of the screen, you will see a list of users, select the one you want to assign a role to. It will be marked in blue.
- On the right-hand side of the screen, you will find a list of Available roles for this user. Click on any to assign it to the user. It will appear in the list above.
- In order to remove a role from a user, simply click on the red X next to the role listed for that user.
- Once you are satisfied with your role assignments for a user, click the Save button in green on the top right to save changes. You must do this for every user you modify.
Actions on Roles
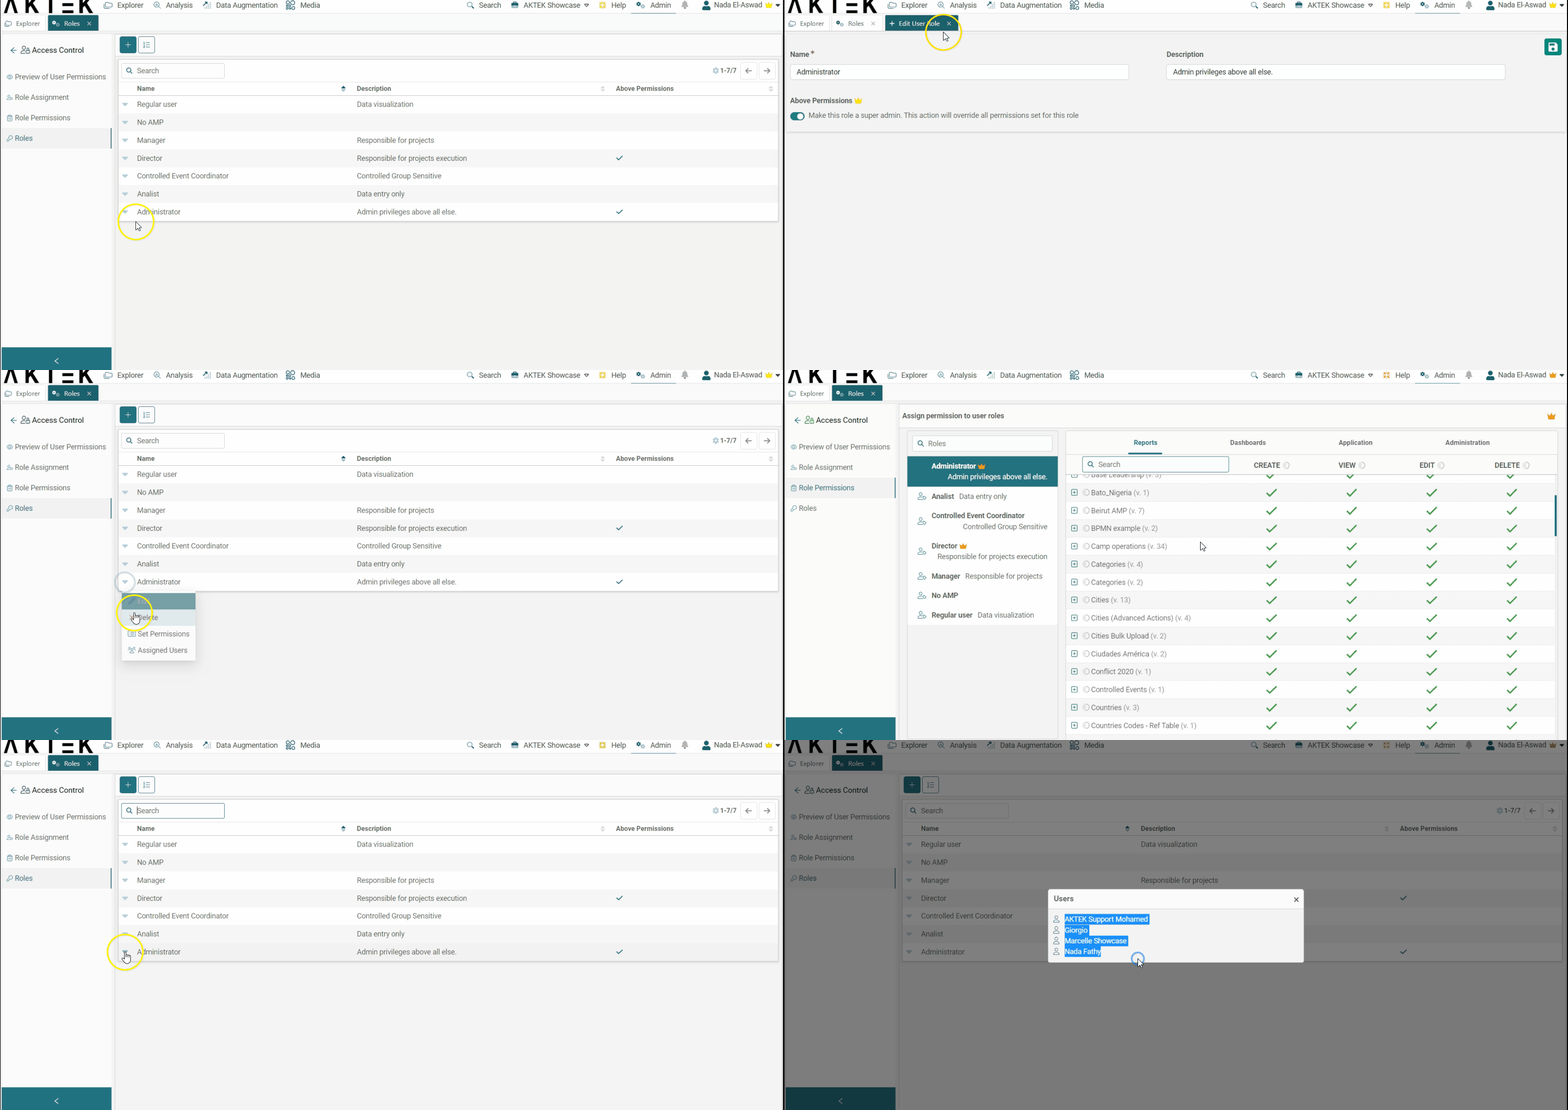
Click on the menu of any role to find the following actions:
- Edit: to change the name, description, and super admin mode
- Delete
- Set permissions: it will redirect you to the role permissions sub-section, with this role pre-selected.
- Assigned users: it will display the list of users having this role assigned to them.
Role Permissions
Once a role has been created, the next step is to set specific permissions for this role in the system.
To do so, you can either:
- Accept the prompt after saving a new role, by clicking on OK.
- Click on the left-hand menu (arrow) of the role and click on Set permissions.
- Click on Role permissions in the left sub-menu of Admin > Access Control section, if you wish to navigate between different roles to set/edit the permissions.
When you click on Set permissions, you will land on a table having four sections denoted by the tabs on the top:
- Under Application, you can restrict access to AKTEK iO (entire app), log in, Admin and Dashboard among other options. Clicking on the checkbox shown on each row will move permission from deny (red x) to allow (green check).
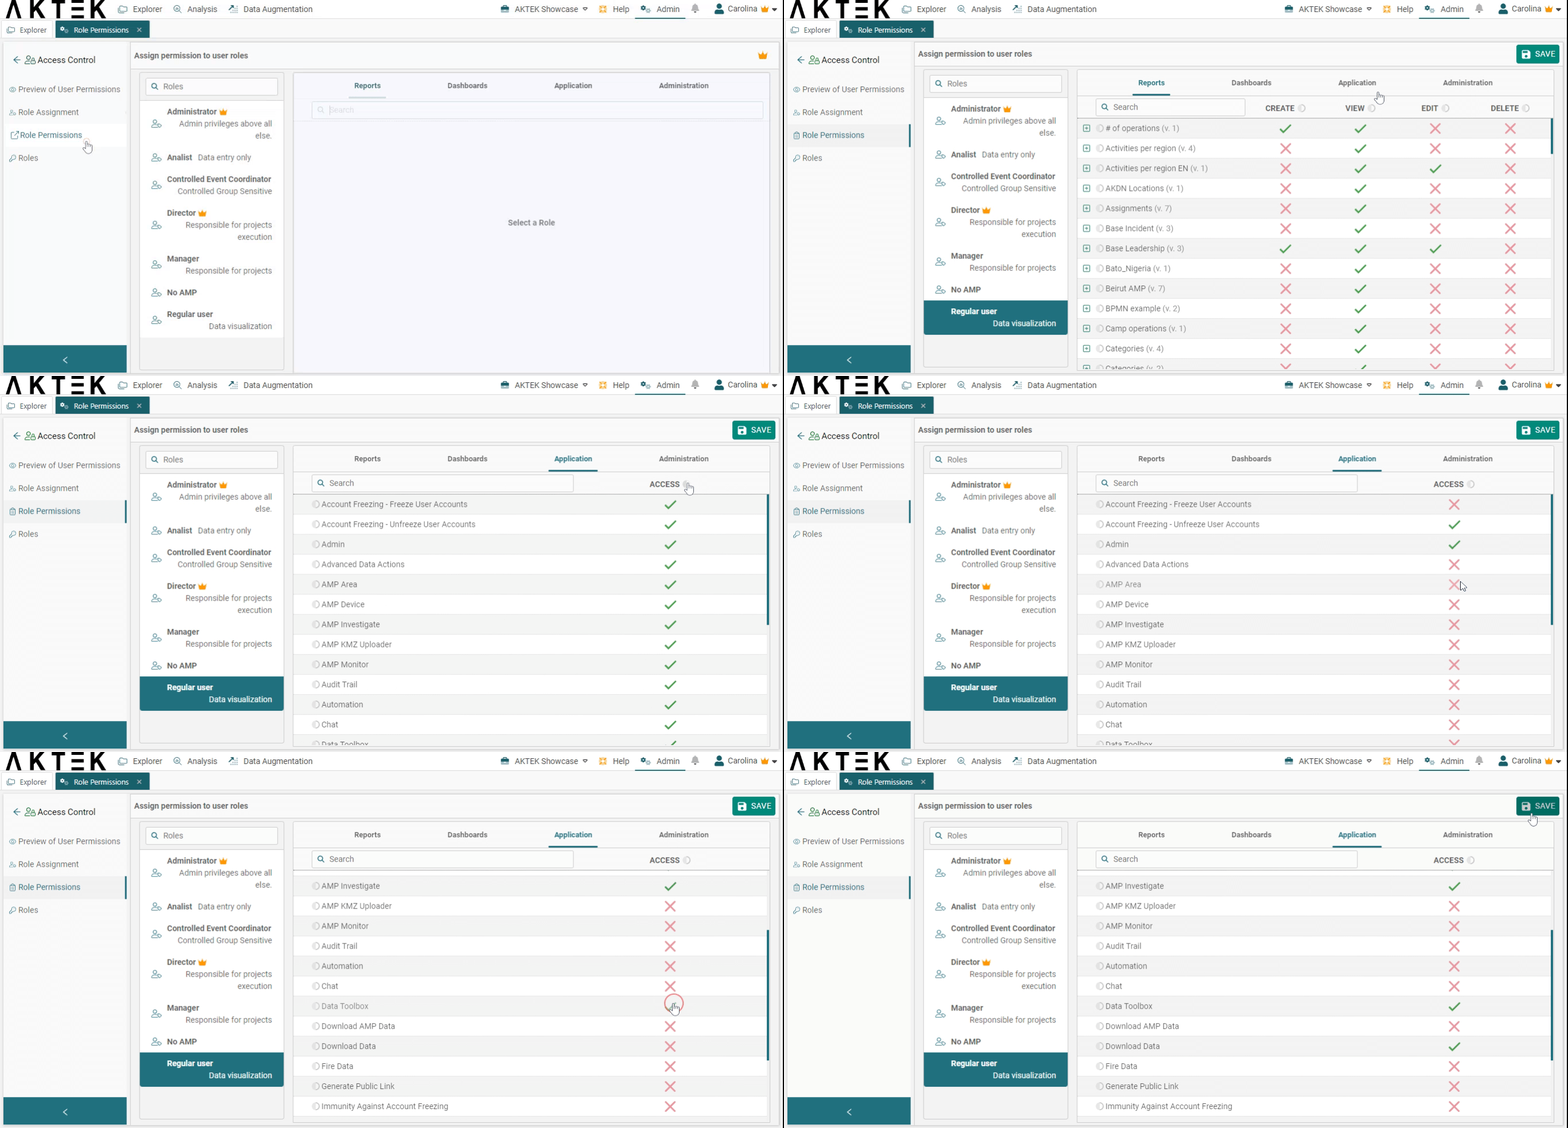
-
Under Administration, you will find permissions for Groups, Permissions, Report Structures, Roles, Users, etc. with the ability to allow or deny Create, View, Edit, and Delete permissions for each of these sections.
-
Under Dashboards, you will find permissions for each Dashboard loaded in Analysis. You can set permissions to View, Edit and Delete a specific dashboard.
-
Under Reports, you will find permissions for each report loaded in the system using Data Structures. Here you can set permissions for the full report or by expanding a report to show its fields using the + icon on the left, set permissions to Create, View, Edit and Delete specific fields within that report.
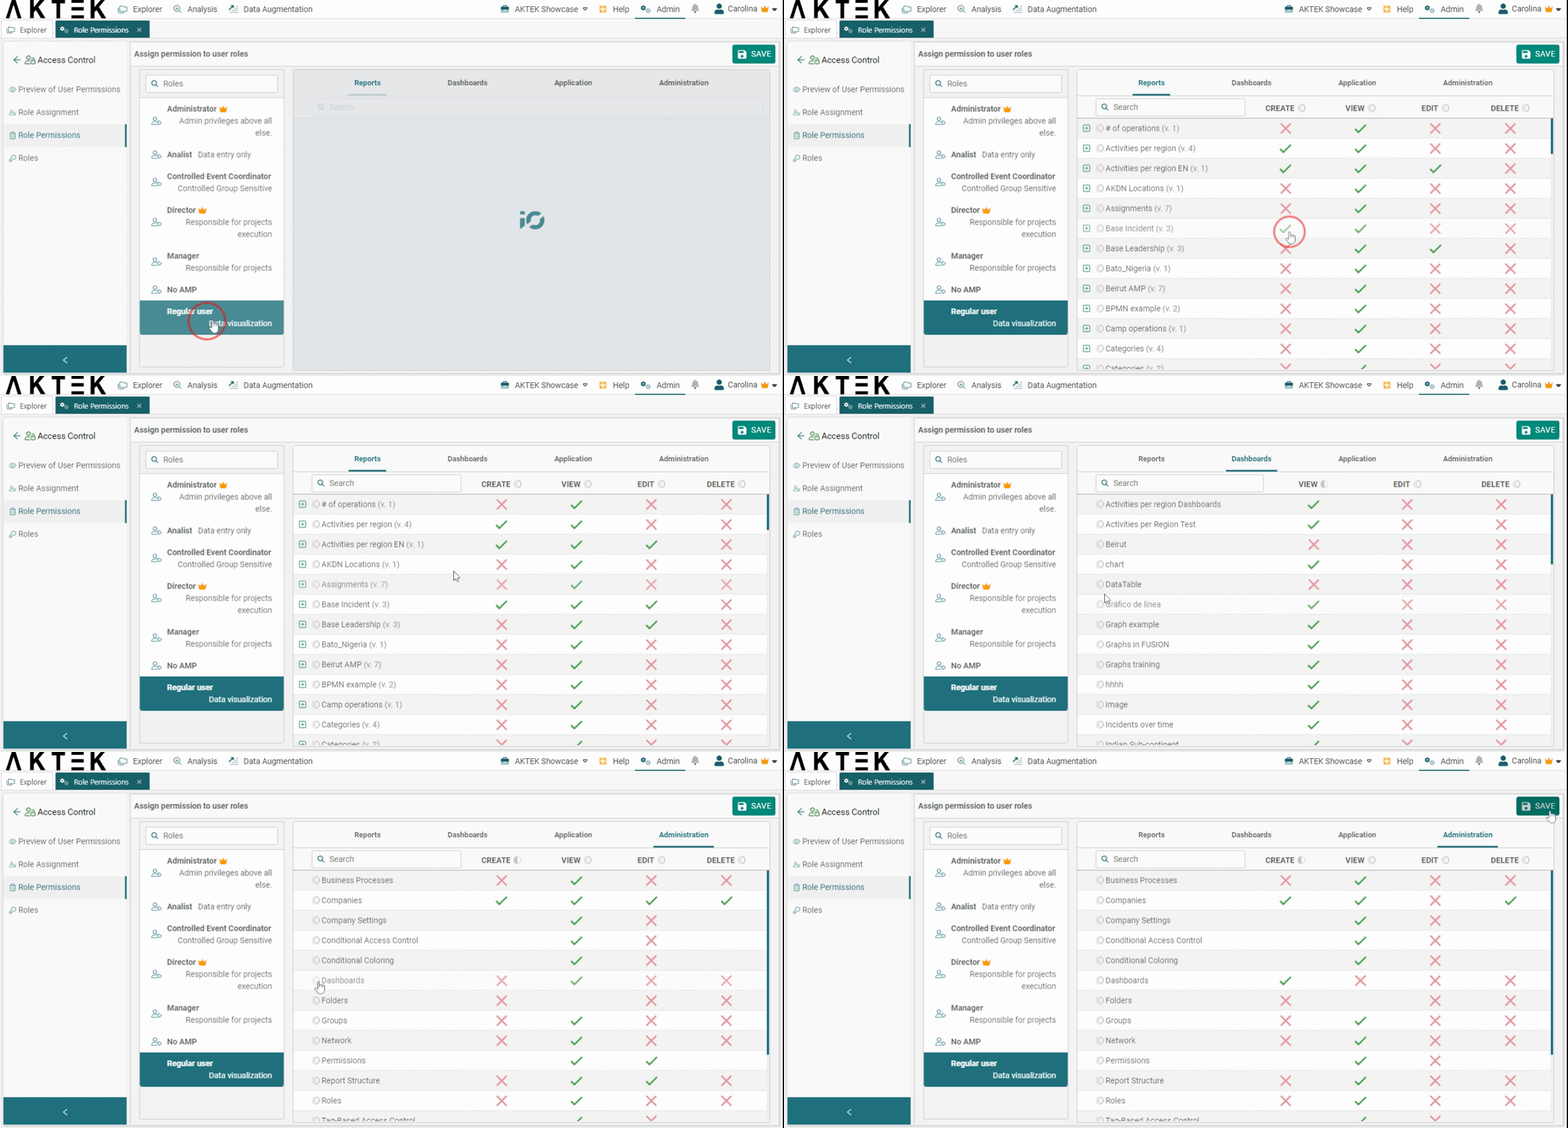
Once you are satisfied with the changes in the Permission section you are working on (Application, Administration, Dashboards, or Reports), remember to hit Save in the top right corner to register the changes made for this role and this section. Repeat the process for each role you modify.
💡 If you wish to change permissions for an entire row or column, find the contrast icon next to that row or column and click on it to change the selection for more than one item at a time.
Preview Permissions
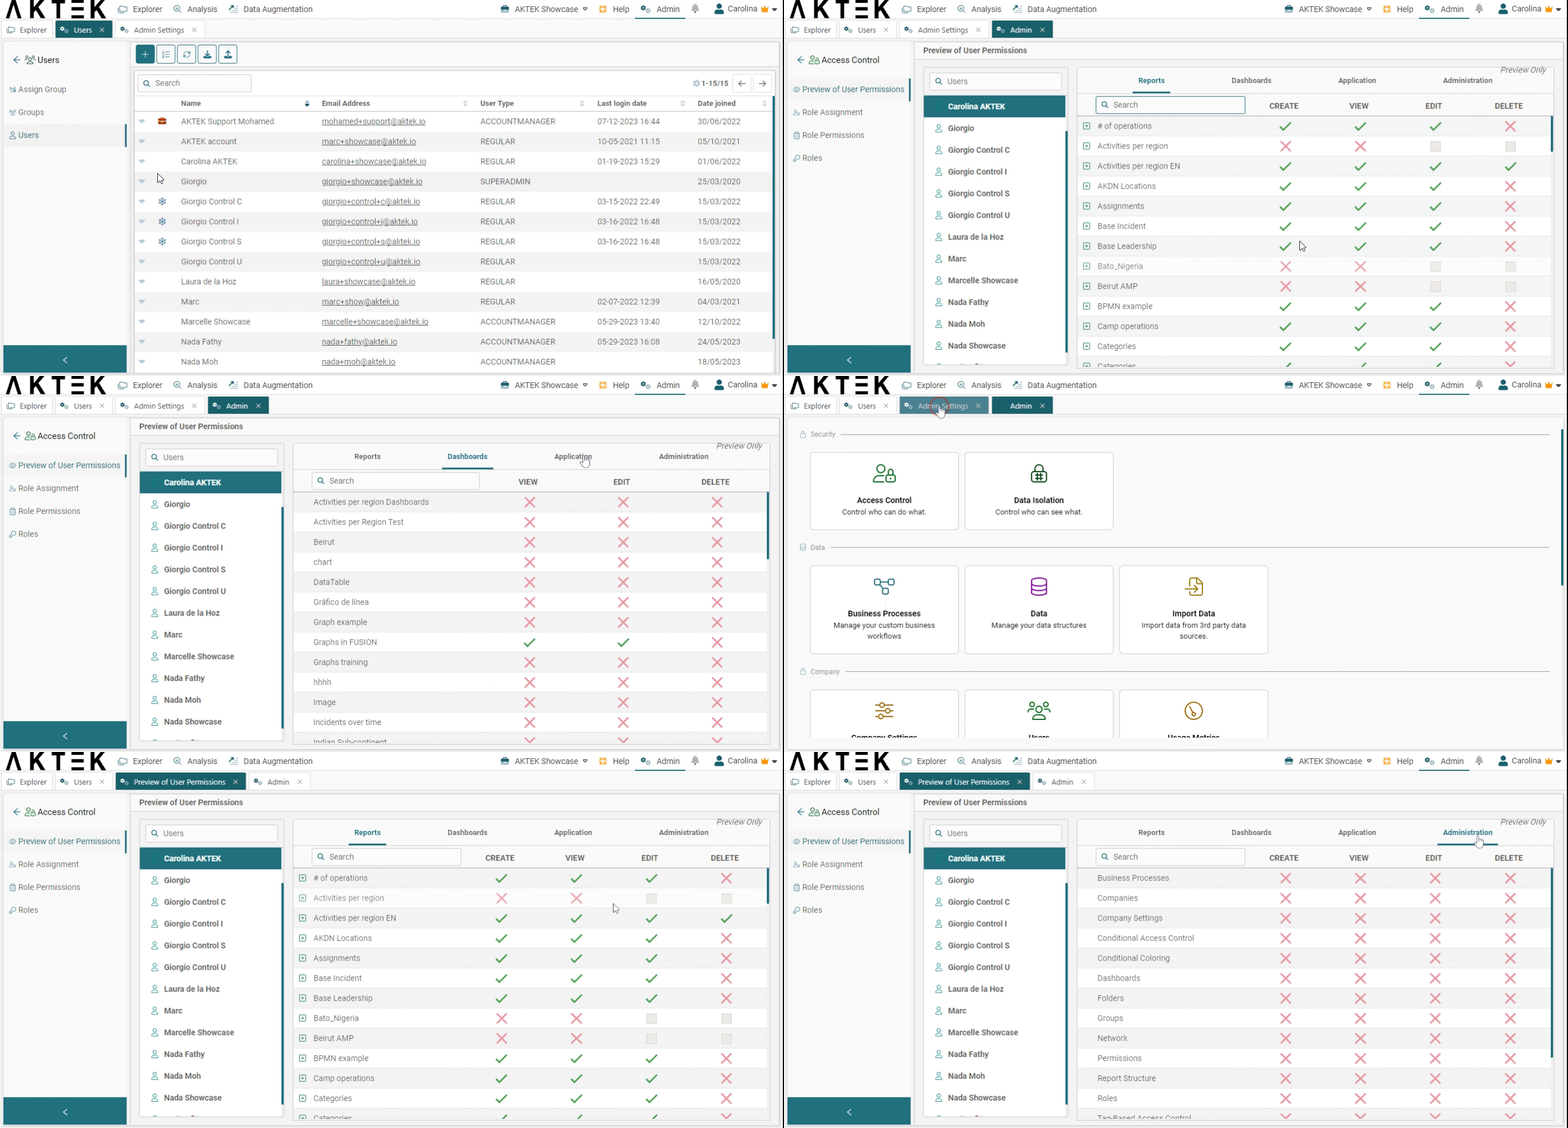
If you’d like to preview what a user can see without risking editing anything, simply select Preview of permissions. This will give you view-only access to the tables previously set up. This is especially handy for visualizing access for users with multiple roles.
Preview User Permissions can be accessed from:
- The left-hand menu (arrow) of a given user.
- The left sub-menu of the Admin > Access Control section, if you want to navigate between different users to see their permissions.
Groups
Create a group
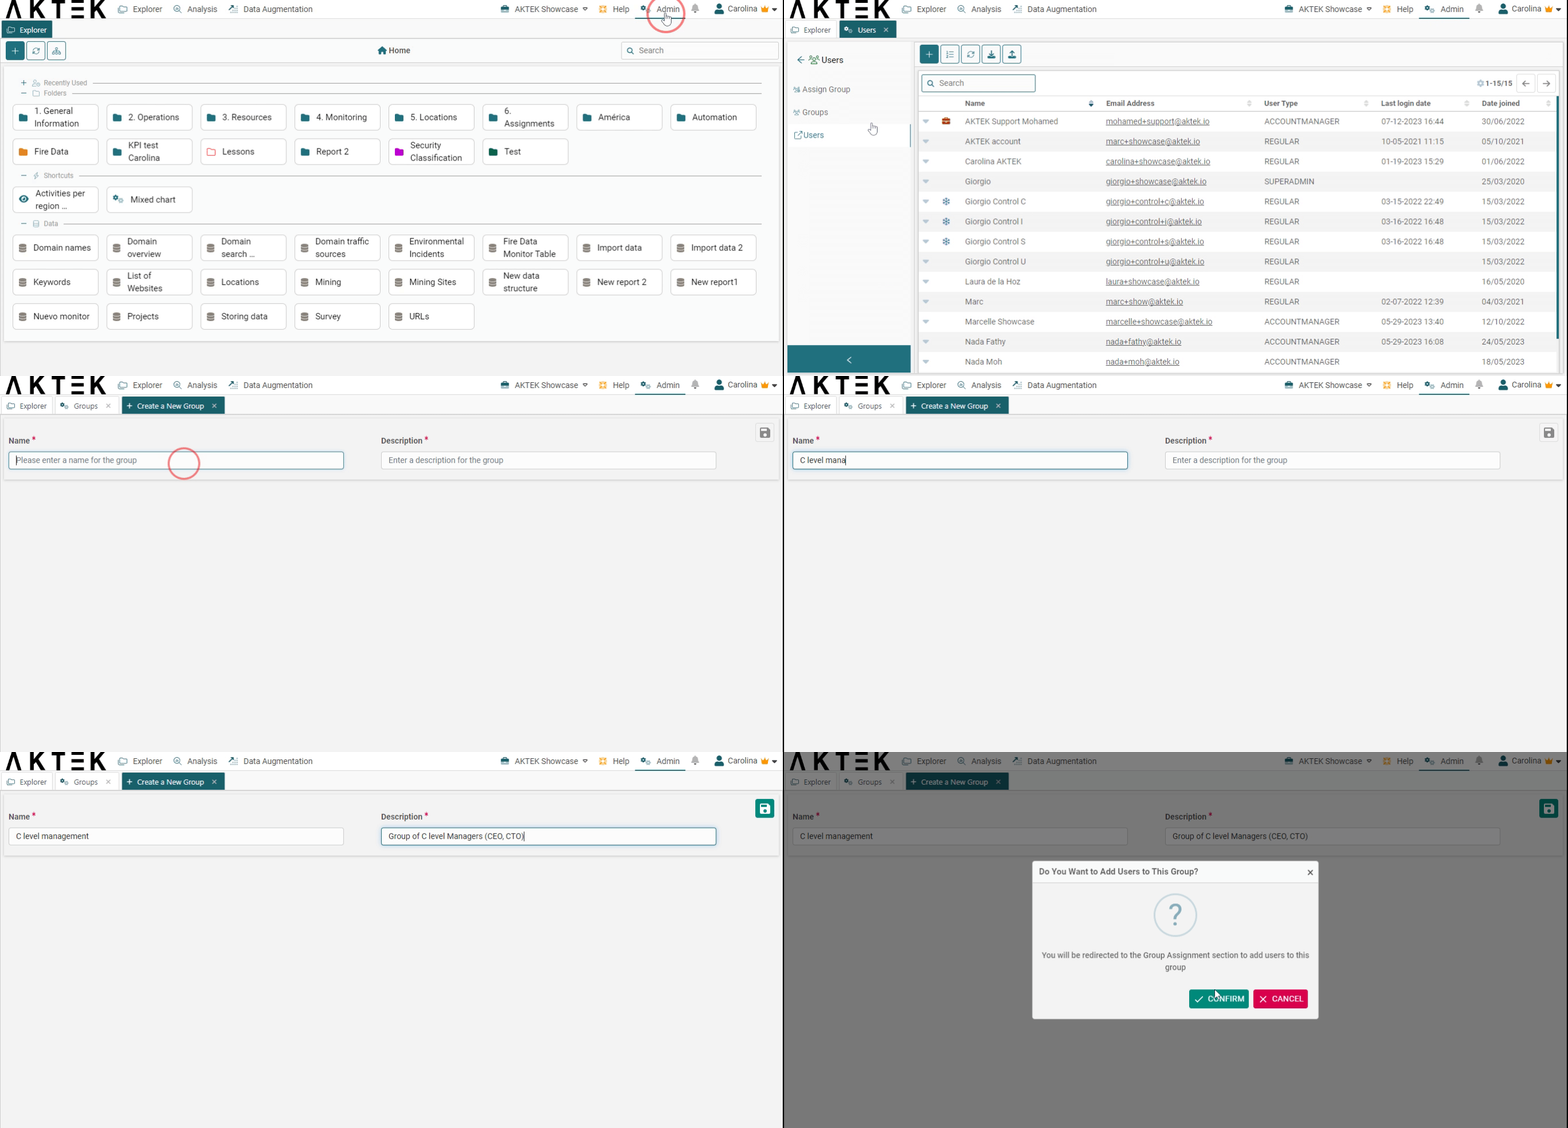
Go to Admin > Users > Groups
Here you can see all groups in the system, or an empty list if you don't have any group yet. To add a new group:
- Click on the + button on the top left.
- Enter a Name and a Description for your group.
- Click Save to register the new group.
- From the table of all existing groups, you can use the search box to look for a specific group.
-
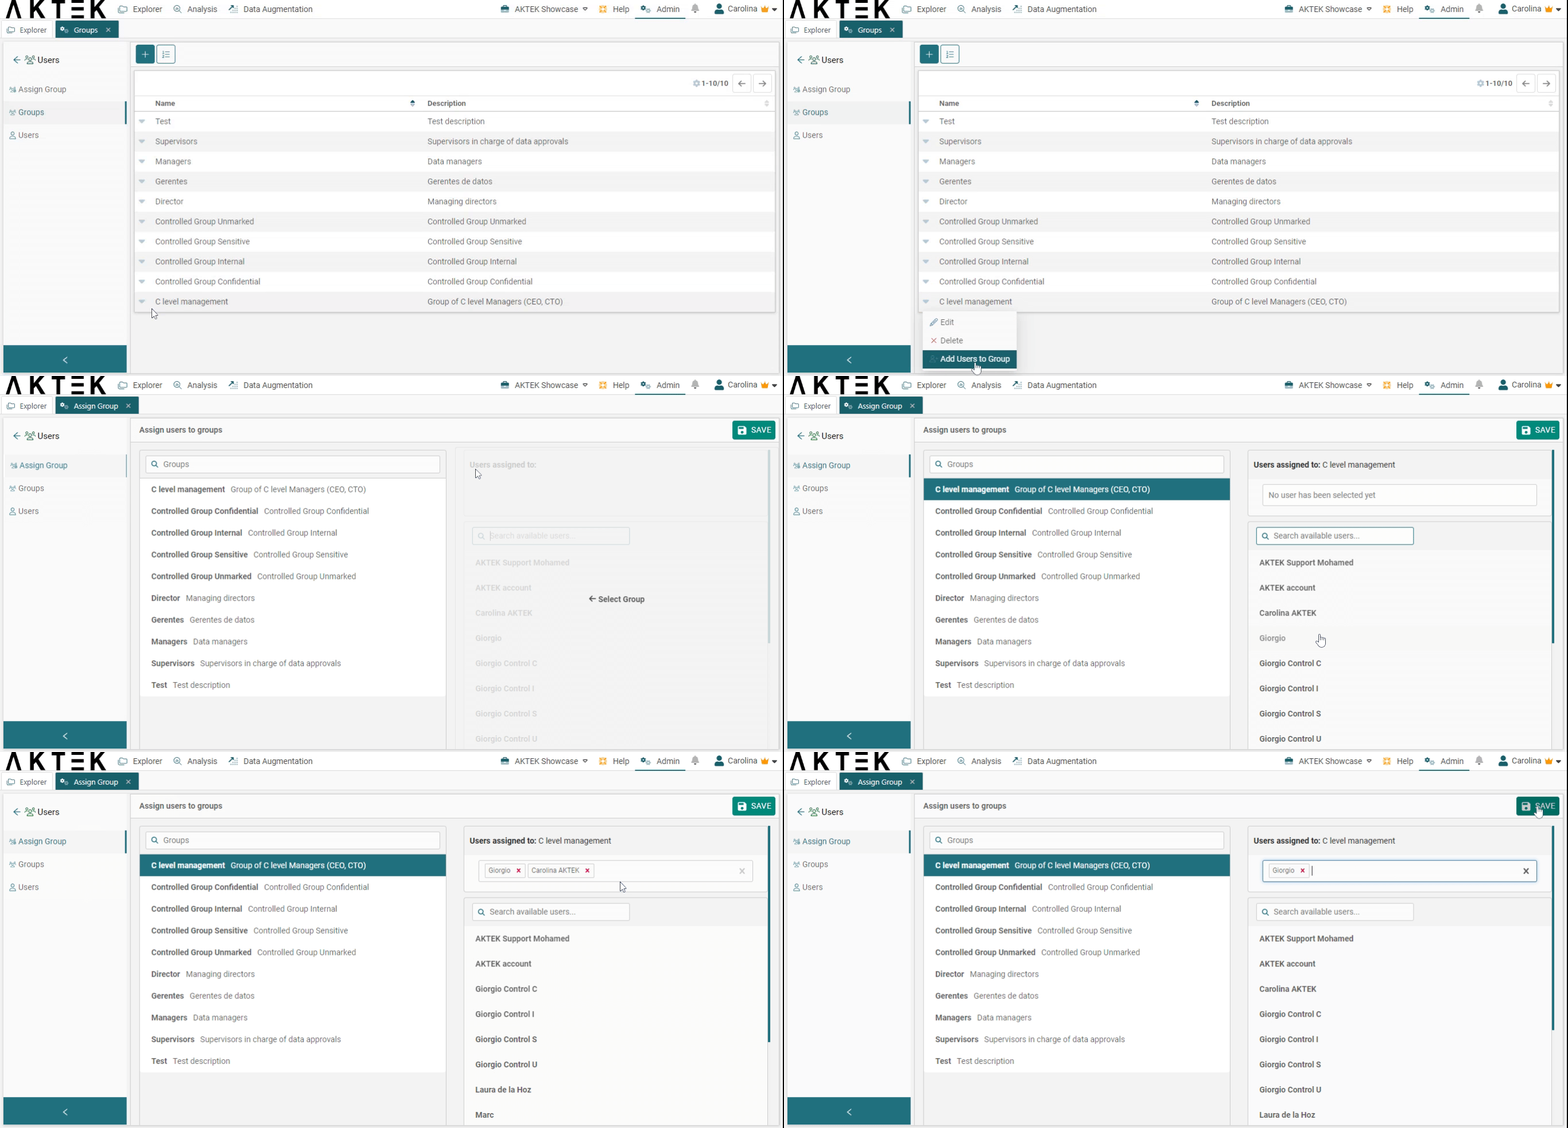
Click on the menu (down arrow) on the left-hand side of the row to edit, delete or add users to the group.
Group Assignment
Add users to a group
Once a group has been created, the next step is to add one or more users to this group.
To do so, you can either:
- Accept the prompt after saving a new group, by clicking on OK.
- Click on the left-hand menu (arrow) of the group and click on Add users to group.
- Click on Assign group in the left sub-menu of the Users section, if you wish to navigate between different groups to add/remove users.
- Pick the group you wish to assign users to; it will show selected in blue.
- On the right-hand side, pick the user(s) you wish to assign to this group from the list of Available users.
- If you wish to remove a user from a group, simply select the group and click on the blue X next to the user name where it says “Users assigned to: [Group name]”.
- Once you are satisfied with the settings, click Save to save all changes.
✅ Groups are assigned upon login. If you edited group assignments for yourself or other users, make sure you log out and log back in again to activate the changes.
💡 Groups will become handy for business process management, allowing you to call upon groups of users to perform a specific task or notify groups of users at different stages of the business process.
